Scrapbook Page Layout – Helpful Techniques…
Experimentation with page elements

Determining layout elements
For those of you following my blog, this is the second part in a series on how I created my first scrapbook page layout from scratch. Hard to believe? Well… up until this past week, I have never done any paper format scrapbook layouts. I must admit, though similar to a digital format, at times it seemed more tedious yet fun to make a layout this way. I love cutting the intricate images and changing the layout around while the base pages are actually laying in front of me on my work surface and not just on my computer screen. I would suppose that if it were the other way around, the “cut-and-paste” scrapbooker would find the digital process just as challenging. This process has definitely given me a new found appreciation for both art forms!
So now on to the process I want to show you today…
Keeping it simple without too much clutter
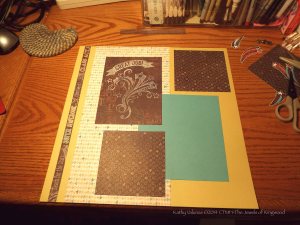
Because this project involved using only one of the new Close To My Heart (CTMH) paper packets from the My Reflections Collections in the new 2014-15 Annual Inspirations Idea Book, choosing the patterns and colors were so much simpler. For this layout I used Chalk-It Up paper packet. You can see all of the papers available in the packet by clicking HERE or on any of the images above. I had to keep telling myself to keep it simple and, as always in the field of graphic design and page layout, to follow the design elements and principles when planning the layout.For this particular layout, I chose asymmetrical balance which means that, even though there are different elements on either side of the page, the positioning or placement of the elements creates a type of balance with each side being somewhat equal in weight if that makes sense.
One of the main features I love the most about CTMH is that each collection of papers includes coordinating patterns and colors in 12 x 12 sheets; 3- double-sided patterned papers and 3 different colors of cardstock. This gives you, the designer, so many options and virtually NO waste because you can use everything. I was so surprised at how much I’ve been able to create with just 6 pieces of paper.
Maintaining a central theme…
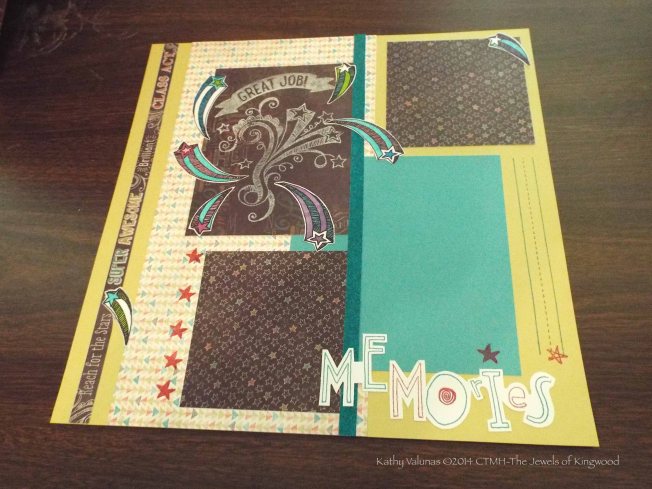
Loving all the patterns and colors was the most challenging part because it was hard not to want to use a little bit of everything! The second page for this spread was even more fun to play with and this is where I added more elements to focus on my school-related theme.Choosing the various elements to embellish my page was a bit tricky because I am like a little kid with all of my tools and arsenal of goodies to use when creating art in any form- I get carried away and before I know it, I have a page or project that looks cluttered and confusing, and this is not the effect you want!

Placement of embellishments can be tricky
Generally, when I approach a new project, I will pick and choose from a variety of stamped images that I have already completed to see what might work. If I don’t have anything in my stash, I try some new stamps, markers, coloring techniques, and experiment with some stick-on embellishments or ribbons to see what works. This part of the process can take awhile because I like to play with several different arrangements before settling on the final look before I glue anything in place. During this phase I still have to keep in mind how the design elements such as lines, shapes, colors, textures, and space are being organized on the page. This means how I use the design principles for a layout; these principles, just to name a few, include balance, unity, harmony, dominance and emphasis, proximity, rhythm, and movement. And…. BTW… don’t forget you will be adding photos to your page layout so be sure to plan enough room for those without looking like the photos were an afterthought.
I hope this bit of technical info wasn’t too confusing and gives you a glimpse at how I approach the layout process. My next post will focus on some of the tools I use for assembling my projects. I will be showing you more in the days to come so be sure to come back often to see what else I will be sharing with you.
Until next time…
~The Jewels of Kingwood


 To be entered into the drawing, simply go shopping on my website. You can use the Close To My Heart link located at the top in the right side column, or click

 Priced 2 Sell
 Part of the homework or research that must be done, is making sure you understand the common mistakes that artists and designers make when setting prices. Perhaps the most significant error is the tendency to focus too much attention on only that segment of the market area that pertains to you and too little attention on the rest, or even worse, dismissing the rest as irrelevant. If you let this happen, your asking prices may make sense to you and to your inner circle, but make little sense to the overall target market or audience you hope to attract. The more aware you are of the big picture, of what others are creating, how it’s being priced and marketed, and who’s buying what for how much and why, the better prepared you are to price your art sensibly.
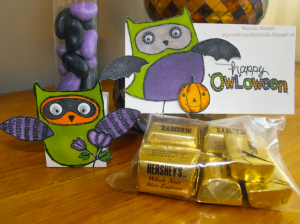
 For example, the set of 6 thank you notes shown to the left use paper from a paper pack, a single “just married” acrylix® stamp and another stamp from a Stamp of the Month Kit, a fancy die cut edger from a set of 4 metal dies, an archival stamp pad, alcohol markers and a blending marker, as well as 6 cards and 6 envelops from a set of 12. I cannot use the actual cost for the supplies because I am not using those just for these 6 cards so I calculate my supplies based on a percentage of what I used from my supply stash. For this example, let’s say my supplies/materials cost is $3.00 x 3 = $9.00. Next, you add the shipping and processing which includes a 6″ x 9″ padded envelope for $1.00 and postage for $2.00 for a total sales price of $12.00.
  To all the Jewels out there who have been blessed with children…